41 how to make print and cut labels on cricut
How to Print and Cut with Your Cricut - Cut Your Own Stickers! First, upload your photo using the instructions above on uploading a JPG image for print and cut. When your photo uploads, it is already set as a print and cut image and is ready to go. You can use the steps above to create a border for your picture. Or, you can change the shape of your photo by slicing your image. How to Make Stickers with your Cricut | A Print Then Cut Tutorial Select both sets and choose"center horizontally" and "center vertically" from the align section at the top. They should then overlap. If you see the cut image on top make sure to right click and send it to back. Highlight everything, right click and choose "attach.". This tells the Cricut that these two steps of printing then ...
Complete Print Then Cut Cricut Guide - How to Make Stickers and More! Make sure the shape is sized bigger than the images and/or text. Next center the two things and set the shape to the very very back. Now select all the layers and switch it to Print then Cut and then Flatten! there you go! Now you will be able to print the labels and cut the shape of the label out in one go!

How to make print and cut labels on cricut
The Ultimate Guide to Cricut Print then Cut - Hey, Let's Make … 16.9.2021 · Cricut Print then Cut expands the things you can make! Print out a design using your printer, and your Cricut will cut around the edge ... you don’t need to weed your project! Just print, cut, and apply like a sticker. Easy! Think decals, planner stickers, labels, and more. Learn more in my post How to Use Printable Vinyl ... Cricut Print then Cut Troubleshooting - Shawn Mosch 9.12.2020 · I saved the best Cricut Print Cut troubleshooting tip for last. This is the thing that I see the MOST people struggling with when it comes to using their Cricut for Print then Cut projects. Typically I see this when someone is trying to make a product care tags. They print out a design and the words in the design look thick or bold. How to Make Name Label Sheets with the Cricut First, open Cricut Design Space. Click on "images" and insert a square. Click on the lock on the lower left hand corner of the square to unlock the square. Size the square to how large you would like the name label sheet. Mine is 6″ by 12.". Click on "images" and insert a 1.5″ circle.
How to make print and cut labels on cricut. Layered Christmas Free SVG Cut File Set for Cricut SVG Files with design fully assembled– ideal for Print and Cut projects, and preparing registration marks for vinyl crafts. Printable Clipart Files – High-resolution PNG format, 300 dpi – saved individually with transparent backgrounds. Make Your Own Easy DIY Planner - 100 Directions Jul 20, 2021 · To short-cut the process, print out pre-made pages that fit what you are looking for. I've created a variety of printable pages you can use when you make your own planner. These planner pages are all designed as full 8.5″ x 11″ sheets, so if you are making a mini planner, make sure to print each page at a smaller size. How to make vinyl stickers with Cricut Make vinyl stickers Step 1 Click on the text box that says "name." Another box should open. Click into that field and type your name. Center the text back on the polka dot design. If your notebook or journal isn't 5" x 7" use the resize arrow on the bottom right of the images to adjust! Step 2 Easy Print & Cut Stickers on a Cricut! - Jennifer Maker 20.3.2020 · Learn how to make easy stickers you can print then cut by hand or on a Cricut! When I was a child, I adored stickers. If I could have, I’d have had a giant collection of stickers! The only thing holding me back from my dreams of stickers everywhere was the price. Stickers were (and are!) so expensive.
How to make labels with Cricut Make labels with Cricut Step 1 To design from scratch, click "New Project" on the home page of Cricut Design Space. Step 2 Once on the canvas, on the left-hand navigation bar, you'll see an option for "Images." Step 3 Click that button. You'll now be able to search in the Cricut image library! How to Make Vinyl Labels with a Cricut Cutting Machine Step 1- Gather your supplies for making vinyl labels. Cricut Explore Air 2 Cutting Mat Cricut Premium Vinyl (I used teal.) Weeder and Scraper Tools Transfer Tape Label Project in Cricut Design Space Step 2- Create your design. If you are using a Cricut machine, you can find my exact project in Cricut Design Space here. HOW TO MAKE STICKERS WITH CRICUT | PRINT THEN CUT - YouTube Join a crafting community through a private Facebook group, get access to hand drawn SVGs for personal and commercial use, and double entry to giveaways. Sig... Sticker Paper Cut Settings Guide for Silhouette, Cricut, and More 7.6.2022 · Make beautiful custom stickers using your electronic cutting machine with this cut settings guide for Silhouette, Cricut, ... Create, design, and print your labels. No downloads necessary. Free activation with purchase. 100% ... Online Labels® Sticker Paper Cut Settings for Cricut Explore 3
How to Make Stickers with Cricut Print + Cut (2022) Step Six: Align, Attach and Rotate the Sticker Sheets. Select BOTH Layers and move the one on the right so its right side is at 9.25″ on the top ruler. Attach the Layers, and then in the Rotate box in the top toolbar type in 90. Select both, rotate , and size images. How to make a cricut paper flower + FREE flower templates … Learn how to make a Cricut paper flower with or without using a Cricut machine! ... Print out the PNG file for template #5. Cut that template out – this is your stencil. Use your stencil on your paper of course. ... Learning how to make your own labels is easy. How to Make Vinyl Labels with a Cricut | A Comprehensive Guide Start by opening Cricut Design Space and use the search bar in the Image Library to find pictures for everything you want to label. Select images that are both simple in design and intuitive to understand. Notice the three images I selected below are not single color/layer images when I first place them on my canvas. How to Make Stickers With a Cricut Using Print Then Cut and The Offset Tool To maximize the amount of stickers you cut, click on Insert Shapes in the left menu, and insert a square. Unlock the square's proportions by clicking on the little lock on the size menu at the top. Change the square's size to 6.25 X 9.75. Click on the Arrange tool in the top menu bar and send the rectangle to the back.
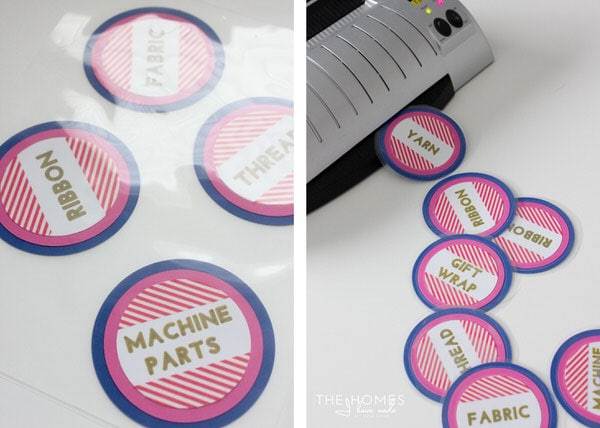
Cricut Explore Essentials: How to Make Pretty Organizing Labels » Christene Holder
Cricut Labels: 3 Ways to Make Them - The Country Chic Cottage Choose both objects and click flatten to make the label a print then cut. Repeat for as many labels as you need. Print when prompted in Cricut Design Space then add to your machine for the cutting. Peel and stick the labels once complete to any surface. Tried this project? tag us to show off your work!

Cricut- Creating A Kiss Cut Sticker Setting | Mayda Madrid | Skillshare
Online Labels® Sticker Paper Cut Settings for Cricut Maker Online Labels Updated 02/07/2022 • ~1 minute read We've tested the new Cricut Maker™ with OnlineLabels.com sticker paper to bring you our recommended cut settings for each material. Continue to the chart below to find the cut settings for kiss cut and full cut stickers. Materials were tested on a Cricut Maker with the fine-point blade.

23++ Print and cut labels cricut trends | This is Edit
Printable Labels with Print then Cut on Your Cricut Machine Click flatten in the lower right-hand corner to make this a print then cut label and it is ready for your machine! Be sure to delete any labels you don't want to use before continuing. Step 3: Making Printable Decorative Labels with Print Then Cut Now it is time to use print then cut to actually make our printable labels.

Popsicle Cut Files + Clip Art - Freebie Friday - Hey, Let's Make Stuff
Easy Print Then Cut How to Create Stickers with your Cricut #cricut #stickers #printthencutSUPPLIES:Cricut Machine: Cutter, mats, tools: paper used: ...

Cricut Explore Essentials: How to Make Pretty Organizing Labels » Christene Holder
Vinyl Pantry Labels - Free SVG Labels! - Hey, Let's Make Stuff Mar 12, 2019 · Cut the files on your Cricut, making sure to select “Vinyl” as your material type. Adhering Labels to Glass Using Transfer Tape. Once the files are cut, weed out everything but the labels—the letters and the white circle. Make sure you check out all of my best weeding adhesive vinyl tips.

RETURN ADDRESS LABELS: Cricut Print then Cut - YouTube
How to Make Tumblers with Cricut Maker - Doodlecraft Labels acid etched alcohol ... Next, have the Cricut Maker cut out the names. Yes, I am using my fabric mat, which is not the norm, ... Check out this post on 5 ways to make money with the Cricut Explore Air 2, which has key tips that can be applied to …
3 Creative Ways to Make Labels with a Cricut Explore | The Homes I Have Made
3 Ways To Make Labels With Your Cricut - YouTube It's a lot easier than you may think, and in this video, Rachel shows three different ways you can make labels with your Cricut. From drawing to print then cut, labels can be made easily and with...

Making Simple Labels Using Cricut - YouTube
How To Use Cricut Print Then Cut / DIY Labels and Stickers Hi guys! In today's video you will see how easy is it to use Cricut's print then cut feature to make labels. I use it today to make some labels for strawberr...

Free Curvy Tag SVG Cut File for Silhouette & EclipsLove Paper Crafts
How to Make Labels with Cricut & Free Pantry Labels file To open the file in Cricut Design Space, click on "Upload" followed by "Upload Image" then "Browse" and chose the file then select "Save". ***For a full step by step tutorial of this process, see my DIY pantry label video tutorial here. Then, select the file and click "insert images". 3. Select labels needed and change size ...

Cricut Explore Essentials: How to Make Pretty Organizing Labels » Christene Holder
Sublimation Stickers: Your Complete DIY Guide First, you will need to make a sublimation print. I am using my Cricut machine to print and then cut my sticker shapes. Upload the images to Cricut Design Space. I am using some cute cactus designs. They already have a white offset of cutting around the outside edge. If your images do not, you can see more about offsets here. If your images are ...

Cricut Explore Essentials: How to Make Pretty Organizing Labels » Christene Holder
How to Print and Cut Round Stickers on the Cricut Go to Design Space at Click New Project Click the Upload button Browse, find, and upload the sticker file On the next screen, under "Select Image Type," choose Simple then click Continue. On the next screen, just click Continue. On the next screen, keep it selected as "Save as print then cut image" then click Save.
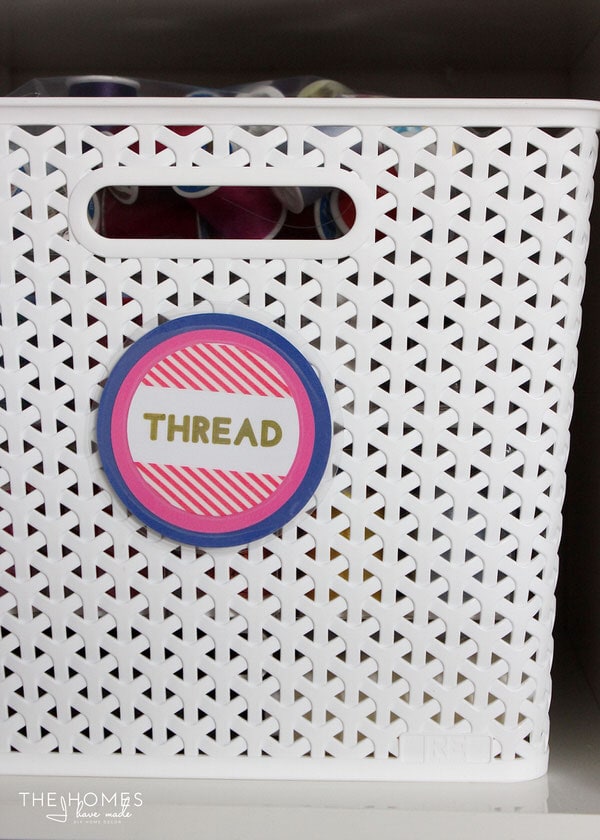
3 Creative Ways to Make Labels with a Cricut Explore | The Homes I Have Made
A Guide To Making Labels with Cricut Print Then Cut Your Cricut machine will first scan the registration marks (the black rectangle) around your labels, and then cut out the shapes with precision! Step 5: Apply Your Labels Once you remove the excess paper around your labels, you can simply peel them off the mat or paper backing (if using sticker paper) and place them wherever you need them!

Print & Cut Label Tutorial in Cricut Design Space
DIY Spice Jar Labels with your Cricut - Daydream Into Reality 30.12.2021 · In today’s tutorial, you will learn how to make spice jar labels with your Cricut Maker, Explore, and Joy! There are many techniques you can use to personalize spice jars. You can use writable vinyl and Cricut pens, Print then Cut, Chalkboard vinyl, etc. After much thought, I decided to teach you how to personalize them with adhesive vinyl.

DIY Return Address Labels with Cricut | Crafty Blog Stalker | Printing labels, Address label ...
Sticker Paper Cut Settings Guide for Silhouette, Cricut, and More Jun 07, 2022 · Online Labels® Sticker Paper Cut Settings for Cricut Explore 3 Skip the hassle of figuring out the right Cricut Explore 3 cut settings for your sticker paper with this guide. Includes kiss cut and full cut settings.
HTV Care Card Machine Instructions SVG Cricut Print and Cut | Etsy
Kitchen Labels, How To Print And Cut On Cricut - Extraordinary Chaos Choose A Sticker Shape. Size Your Print And Cut Label. Now Create A Background For Your Label. Flatten Your Label. Add Text And Any Images. A Few Tips For Using Cricut Print And Cut. Other Uses For Printable Stickers. Inex. Making Kitchen Labels Via Print And Cut On The Cricut Maker.

Personalized Labels with the Cricut!
Easy Print then Cut Stickers with Cricut | Design Bundles Start by pressing the green Make It button on the upper right hand corner of the screen. This will start the cutting process and take you to another page. Step 18 - Continue to next page Click the Green Continue button on the lower right-hand corner of your screen. Step 19 - Send to Printer Click on the green Send to printer button. Step 20 - Print

Cricut Explore Essentials: How to Make Pretty Organizing Labels » Christene Holder
How To Flatten In Cricut Design Space - Practically Functional Sep 23, 2020 · In order to make it print the image and then make one single cut around the exterior of the whole image, you need to add a shape as a background layer. (And remember, your Cricut will cut out around the outline of that background shape when doing Print then Cut.) Unhide the white square layer and position it behind the “Have a magical day ...
Father's Day Craft Ideas with the Cricut - Hey, Let's Make Stuff
Print & Cut Label Tutorial in Cricut Design Space - Crafting a Family Take the printed page with the black border and place it on your mat. Load it in the machine with the "arrow" button, and Press the "C" button to start the print and cut. When the images are cut, remove the mat and you will have beautiful stickers. Please let me know if you have any questions or if one of the steps is not clear.
Post a Comment for "41 how to make print and cut labels on cricut"